

In a world where digital security and user convenience are increasingly important, passwordless login systems are emerging as a popular solution. They offer a seamless user experience by eliminating the need to remember and manage passwords, which are often reused and vulnerable to attacks. One such solution is Firebase's Email Link Authentication.
This article walks you through implementing Email Link Authentication using Firebase in a Flutter app, with a focus on Flutter Web. We will cover everything from setting up Firebase to sending and handling email links for authentication.
By the end of this guide, you'll have a working passwordless sign-in system using email links, and a clear understanding of how to adapt it for production-ready apps.
Table of Contents
- Understanding Firebase Email Link Auth
- Setting Up Your Flutter Project
- Implementing Email Link Sign-In
- Handling the Email Link
- Testing Your Implementation
- Common Pitfalls and Troubleshooting
- Conclusion
Understanding Firebase Email Link Auth
Firebase Email Link Authentication is a modern, secure method of signing in users without requiring a password. It relies on sending a time-sensitive, unique authentication link to the user's email address, allowing for a smoother user experience and improved security posture.
How it works:
- The user enters their email address in your app.
- Firebase sends a unique, secure sign-in link to that email.
- The user clicks the link, which opens your app (on web or mobile).
- Your app detects the incoming link and signs in the user.
Why it's effective:
This method completely eliminates the need for storing or managing passwords. It minimizes friction in the login flow especially useful for apps where users sign in occasionally or on multiple devices.
Benefits:
- Improved User Experience (UX): Users don't need to create, remember, or reset passwords. This lowers barriers to sign-in and reduces support costs related to login issues.
- Enhanced Security: Passwordless auth reduces risks of common attacks like password reuse, phishing, brute force, and credential stuffing. Each email link is short-lived and single-use.
- Cross-platform Compatibility: Works seamlessly on web, Android, and iOS using a consistent codebase. Firebase Dynamic Links helps bridge deep linking across mobile platforms.
- Easy to Implement with Firebase: Firebase provides built-in methods and SDK support to handle sending, receiving, and validating email links—cutting down on custom backend effort.
- Great for Lightweight or Infrequent Auth Flows: Perfect for apps where users don’t log in frequently, such as dashboards, admin panels, or feedback tools.
Prerequisites
Before diving in, ensure your development environment is properly set up. This section lists the tools and configurations you need to follow along smoothly.
To follow along with this guide, ensure you have the following:
- Flutter SDK (preferably the latest stable version)
- Firebase Project with Email/Password auth enabled
- Basic Flutter + Firebase knowledge
A custom domain or localhost for testing (required for web authentication)
Setting Up Your Flutter Project
Before implementing Email Link Authentication, you need to create a new Flutter project and configure it with Firebase. This section walks you through initializing your Flutter app, adding necessary dependencies, and linking it with your Firebase project.
Step 1: Create a new Flutter project
flutter create email_link_auth
cd email_link_auth
Step 2: Add dependencies
Edit the pubspec.yaml:
dependencies:
  flutter:
    sdk: flutter
  firebase_core: ^2.30.0
  firebase_auth: ^4.17.4
  shared_preferences: ^2.2.2
  url_launcher: ^6.2.5
Run the command:
flutter pub getStep 3: Initialize Firebase
Use the flutterfire CLI:
flutterfire configure
This generates firebase_options.dart with platform-specific configuration.
Update the main.dart:
void main() async {
  WidgetsFlutterBinding.ensureInitialized();
  await Firebase.initializeApp(
    options: DefaultFirebaseOptions.currentPlatform,
  );
  runApp(const MyApp());
}
Implementing Email Link Sign-In
This is where you send the sign-in email link. You'll build a simple UI, configure the email link, and store the user’s email locally for use after the link is clicked.
Send the Sign-In Link
When a user enters their email:
final ActionCodeSettings acs = ActionCodeSettings(
  url: 'http://localhost:5000',
  handleCodeInApp: true,
);

await FirebaseAuth.instance.sendSignInLinkToEmail(
  email: email,
  actionCodeSettings: acs,
);
Store Email Locally
You'll need it to complete the sign-in later:
final prefs = await SharedPreferences.getInstance();
prefs.setString('email', email);
Create a simple UI with a TextField and a Send button to trigger the above logic.

Handling the Email Link
Once a user clicks the link in their email, your app needs to recognize it and complete the sign-in process. This section shows how to detect and handle that incoming authentication link.
When the app loads, check if the URL is a sign-in link:
final prefs = await SharedPreferences.getInstance();
final email = prefs.getString('email');
final Uri deepLink = Uri.base;

if (email != null && FirebaseAuth.instance.isSignInWithEmailLink(deepLink.toString())) {
  final userCredential = await FirebaseAuth.instance.signInWithEmailLink(
    email: email,
    emailLink: deepLink.toString(),
  );
  final user = userCredential.user;
  // Navigate to home screen or dashboard
}
This logic can be placed inside your app’s initial route or splash screen.
Testing Your Implementation
With your code in place, it's time to verify that it works. Here, you'll run your app in a browser and simulate a complete email link authentication flow using a local test environment.
Local Testing (Flutter Web)
- Run the app:
flutter run -d chrome --web-port 5000
- Enter an email address and click the Send button.
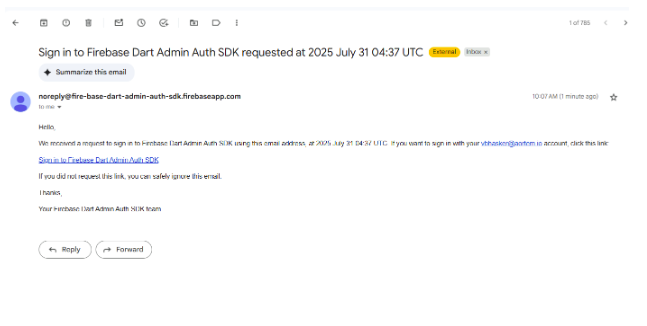
- Check your email and click the sign-in link.
- The app opens in the browser and signs you in automatically.
Ensure http://localhost:5000 is added to your Firebase project's Authorized Domains.
Improvment for Production
To make your implementation production-ready, you'll need to handle deep linking for mobile, use a custom domain, and add proper error handling. This section outlines the key enhancements for real-world deployment.
Deep Linking on Mobile
To support Android/iOS:
- Use Firebase Dynamic Links
- Set up intent filters and URL schemes
Custom Domains
Use a custom domain to improve trust and branding in the email links.
Error Handling
Add try-catch blocks around:
- Sending email
- Reading SharedPreferences
- Signing in with link
Show helpful UI messages for errors like:
- "Invalid email link"
- "This email link has expired"
Common Pitfalls and Troubleshooting
Even with the right setup, certain issues can prevent your Email Link Authentication flow from working as expected. This section covers common mistakes, how to identify them, and ways to fix them.
Issue: SharedPreferences is null
Explanation: If the user opens the sign-in link in a new browser window or tab before the email is saved locally, the app won't find the stored email needed to complete sign-in.
Fix: Make sure you store the email in SharedPreferences before sending the link, and consider adding a fallback email input field on the link-handling screen as a backup.
Issue: Sign-in link opens the wrong app
Explanation: This usually happens on mobile if deep links are not properly configured. Firebase Dynamic Links or custom schemes need to be set up to route users to your app.
Fix: Ensure you're using Firebase Dynamic Links with appropriate intent filters (Android) or Universal Links (iOS). Verifying the link opens your app with the correct path and query parameters.
Issue: Link has expired
Explanation: Firebase email links have a default expiration window (usually 15 minutes). Opening a stale link results in failure to sign in.
Fix: Advise users to click the link promptly and provide an option to resend the link if needed. Log errors and notify users with friendly messages like "This link has expired. Try signing in again."
Issue: Browser blocks redirect
Explanation: Some browsers block automatic navigation or pop-ups when opening email links, especially in strict privacy modes.
Fix: Test in incognito mode or advise users to allow pop-ups for your domain. Consider using window.location.href as a fallback to trigger navigation manually in Flutter Web.
Conclusion
Implementing Email Link Authentication using Firebase and Flutter offers a modern, secure, and user-friendly alternative to traditional login forms. It's easy to integrate, works well across platforms, and eliminates the need for password management.
You now have a fully functioning example for Flutter Web. You can expand it to mobile platforms, improve the UI, and integrate it into your production app.
