

Authentication is a core process or functionality in software development. It is a method in which a user’s identity is verified to confirm they are who they say they are allowed access to a service. There are several ways of implementing authentication in an application, the most commonly used method being the email and password method of verification.
Backend-as-a-service platforms like Firebase help developers better handle authentication processes on their applications. Firebase, a backend cloud computing platform provides a reliable authentication amongst other services such as databases, cloud storage, hosting, cloud functions, etc.
In this article, you’ll learn a step-by-step process of how to implement a simple authentication service in a Flutter web app using Firebase.
Table of Contents
- Prerequisites
- How to Setup a Flutter Project
- How to Setup a Firebase Project
- Enabling Firebase Authentication
- Initializing Firebase in Flutter Web
- Setting Up the Auth Service
- Enabling Firebase Authentication
- How to Implement Firebase Email & Password Authentication
- Testing Firebase Dart SDK in Flutter Web App
- Conclusion
Prerequisites
To successfully complete this project, the following prerequisites should be met.
- Install Flutter and Dart SDKs on your local machine. Use the command below to confirm each SDK is installed.
dart --version
flutter --version- You have a basic knowledge of Dart programming language.
How to Setup a Flutter Project
With the above listed prerequisites fulfilled, we’ll set up a Flutter project with the following steps.
- Run the following command in your terminal:
flutter create flutter_auth_app
- Navigate to your project’s root folder using the command below:
cd flutter_auth_app
More on how to get started can be found in the Flutter documentation.
How to Setup a Firebase Project
This section covers how to set up a Firebase project which will be used for your Vue.js app, my-vue-app.
- Navigate to the Firebase Console and sign in.
- Click on Create a new Firebase project.
- Enter your project name, e.g. vue-firebase-project-10.
- Enable Gemini AI and Analytics (optional).
- Click Create project.
- Go to Project Settings → General → Web and register your app.
Enabling Firebase Authentication
To make use of Firebase authentication methods within your Vue.js app you’ll need to enable Firebase authentication within the console. Follow the outline steps below:
- Click on Build on the Firebase console sidebar to reveal Authentication in the drop down.
- Click on Authentication and then Get Started.
- In the Sign-in method tab, click Email/Password.
- Enable Email/Password and click Save.
Initializing Firebase in Flutter Web App
After setting up your Firebase project, we’ll proceed to initialize it within your Flutter app as outlined in this section. This will create a connection between your Flutter app and Firebase for easy authentication flow.
- In the root directory of your project, install the Firebase Dart Admin Auth SDK with the command below:
flutter pub add firebase_dart_admin_auth_sdk
The Firebase Dart Admin Auth SDK is a Dart implementation of the FIrebase authentication SDK.
- Add the SDK to your project, import it into the lib/main.dart file:
// import firebase_dart_admin_auth_sdk package
import 'package:firebase_dart_admin_auth_sdk/firebase_dart_admin_auth_sdk.dart';- Place the following code snippet in the lib/main.dart file.
import 'package:flutter/material.dart';
import 'package:firebase_dart_admin_auth_sdk/firebase_dart_admin_auth_sdk.dart';

import 'package:provider/provider.dart';
import 'auth_service.dart';

void main() async {
  WidgetsFlutterBinding.ensureInitialized();

  await FirebaseApp.initializeAppWithEnvironmentVariables(
    apiKey: 'YOUR_API_KEY',
    authdomain: 'YOUR_AUTH_DOMAIN',
    projectId: 'YOUR_PROJECT_ID',
    messagingSenderId: 'YOUR_SENDER_ID',
    bucketName: 'YOUR_BUCKET_NAME',
    appId: 'YOUR_APP_ID',
  );

  final auth = FirebaseApp.instance.getAuth();

  runApp(
    ChangeNotifierProvider(
      create: (_) => AuthService(auth),
      child: const MyApp(),
    ),
  );
}
One way to initialize the Firebase Dart Admin Auth SDK is to use the
FirebaseApp.initializeAppWithEnvironmentVariables() method. This method uses your Firebase API Key and project ID to initialize the Firebase Dart SDK.
The authentication service from the initialized Firebase instance is returned after the getAuth() method call. The returned auth object is the main interface for managing authentication in your app.
Setting Up The Auth Service
In setting up the auth service, create an auth_service.dart file within your lib folder.
You can use the command below to create one if not already created with a text editor.
touch lib/auth_service.dart
Within your project’s lib folder, locate the auth_service.dart file and add the following code.
import 'package:flutter/material.dart';
import 'package:firebase_dart_admin_auth_sdk/firebase_dart_admin_auth_sdk.dart';

class AuthService extends ChangeNotifier {
  final FirebaseAuth _auth;
  User? _user;

  AuthService(this._auth);

  User? get currentUser => _user;

Future<void> register(String email, String password) async {
  try {
    final credential = await _auth.createUserWithEmailAndPassword(
      email,
      password,
    );

    _user = credential.user;
    notifyListeners();
  } catch (e) {
    debugPrint("Register error: $e");
    rethrow;
  }
}

Future<void> login(String email, String password) async {
  try {
    final credential = await _auth.signInWithEmailAndPassword(
      email,
      password,
    );

    _user = credential?.user;
    notifyListeners();
  } catch (e) {
    debugPrint("Login error: $e");
    rethrow;
  }
}
  /// Logout
  Future<void> logout() async {
    try {
      await _auth.signOut();
      _user = null;

      notifyListeners();
    } catch (e) {
      debugPrint("Logout error: $e");
    }
  }
}
An AuthService class is created in the auth_service.dart file with the following methods, register, login and logout.
A private FirebaseAuth and User instances _auth _user are declared respectively. The _auth instance is supplied as an argument to the AuthService() constructor. The register method uses the _auth.signInWithEmailAndPassword() instance method to create a new user with email and password.
The login method uses the _auth.signInWithEmailAndPassword() method to login users into the application. Similarly, the _auth.signOut() method is used to log out users from the application.
How to Implement Firebase Email & Password Authentication
The next step in the process will be to create Login, Register and Dashboard components. Within the lib/main.dart file we’ll create classes to handle log in, registration and log out.
After creating each file, place the code snippets in the appropriate file as shown below:
Filename: lib/main.dart | Class LoginScreen
class LoginScreen extends StatefulWidget {
  const LoginScreen({super.key});

  @override
  State<LoginScreen> createState() => _LoginScreenState();
}

class _LoginScreenState extends State<LoginScreen> {
  final emailController = TextEditingController();
  final passwordController = TextEditingController();
  bool isRegistering = false;

  @override
  Widget build(BuildContext context) {
    final authService = Provider.of<AuthService>(context);

    return Scaffold(
      appBar: AppBar(title: Text(isRegistering ? 'Register' : 'Login')),
      body: Padding(
        padding: const EdgeInsets.all(16.0),
        child: Column(
          children: [
            TextField(
              controller: emailController,
              decoration: const InputDecoration(labelText: 'Email'),
            ),
            TextField(
              controller: passwordController,
              obscureText: true,
              decoration: const InputDecoration(labelText: 'Password'),
            ),
            const SizedBox(height: 20),
            ElevatedButton(
              onPressed: () async {
                try {
                  if (isRegistering) {
                    await authService.register(
                      emailController.text.trim(),
                      passwordController.text.trim(),
                    );
                  } else {
                    await authService.login(
                      emailController.text.trim(),
                      passwordController.text.trim(),
                    );
                  }
                } catch (e) {
                  ScaffoldMessenger.of(
                    context,
                  ).showSnackBar(SnackBar(content: Text('Error: $e')));
                }
              },
              child: Text(isRegistering ? 'Register' : 'Login'),
            ),

            TextButton(
              onPressed: () {
                setState(() {
                  isRegistering = !isRegistering;
                });
              },
              child: Text(
                isRegistering
                    ? 'Already have an account? Login'
                    : 'Don’t have an account? Register',
              ),
            ),
          ],
        ),
      ),
    );
  }
}
The LoginScreen class provides input fields for email and password for users to enter their email address and password to be verified and logged in. The Login interface toggles for both user login and registration.
For login, the user email and password are used as arguments for the Firebase signInWithEmailAndPassword() method to sign in the user. User inputted data is passed to the Firebase createUserWithEmailAndPassword() method to create a new user and store in the database when a user is registered.
Filename: lib/main.dart | Class DashboardScreen
class DashboardScreen extends StatelessWidget {
  const DashboardScreen({super.key});

  @override
  Widget build(BuildContext context) {
    final authService = Provider.of<AuthService>(context);

    return Scaffold(
      appBar: AppBar(
        title: const Text('Dashboard'),
        actions: [
          IconButton(
            icon: const Icon(Icons.logout),
            tooltip: "Logout",
            onPressed: () async {
              await authService.logout();
            },
          ),
        ],
      ),
      body: Center(
        child: Text(
          'Welcome, ${authService.currentUser?.email ?? "User"}!',
          style: const TextStyle(fontSize: 20),
        ),
      ),
    );
  }
}
The dashboard displays a welcome text alongside the user’s display name or email address using a simple component. A logout button is also applied to allow users to log out.
To log out, a logout() function uses the Firebase signOut() method to log the current user out of the application.
Update the lib/main.dart
Next make an update to the main.dart in the lib folder.
Filename: lib/main.dart
import 'package:flutter/material.dart';
import 'package:firebase_dart_admin_auth_sdk/firebase_dart_admin_auth_sdk.dart';
import 'package:provider/provider.dart';
import 'auth_service.dart'; // create this file with the class above

void main() async {
  WidgetsFlutterBinding.ensureInitialized();

  await FirebaseApp.initializeAppWithEnvironmentVariables(
    apiKey: 'AIzaSyDvP1niacGpYx4K2iZl4jmqAawf67omXOY',
    authdomain: 'YOUR_AUTH_DOMAIN',
    projectId: 'vue-firebase-project-10',
    messagingSenderId: 'YOUR_SENDER_ID',
    bucketName: 'vue-firebase-project-10.firebasestorage.app',
    appId: 'YOUR_APP_ID',
  );

  final auth = FirebaseApp.instance.getAuth();

  runApp(
    ChangeNotifierProvider(
      create: (_) => AuthService(auth),
      child: const MyApp(),
    ),
  );
}

class MyApp extends StatelessWidget {
  const MyApp({super.key});

  @override
  Widget build(BuildContext context) {
    return MaterialApp(
      title: 'Flutter Firebase Dart Auth Demo',
      theme: ThemeData(
        colorScheme: ColorScheme.fromSeed(seedColor: Colors.blue),
      ),
      home: const AuthGate(),
    );
  }
}

class AuthGate extends StatelessWidget {
  const AuthGate({super.key});

  @override
  Widget build(BuildContext context) {
    final authService = Provider.of<AuthService>(context);

    if (authService.currentUser != null) {
      return const DashboardScreen();
    } else {
      return const LoginScreen();
    }
  }
}

class LoginScreen extends StatefulWidget {
  const LoginScreen({super.key});

  @override
  State<LoginScreen> createState() => _LoginScreenState();
}

class _LoginScreenState extends State<LoginScreen> {
  final emailController = TextEditingController();
  final passwordController = TextEditingController();
  bool isRegistering = false;

  @override
  Widget build(BuildContext context) {
    final authService = Provider.of<AuthService>(context);

    return Scaffold(
      appBar: AppBar(title: Text(isRegistering ? 'Register' : 'Login')),
      body: Padding(
        padding: const EdgeInsets.all(16.0),
        child: Column(
          children: [
            TextField(
              controller: emailController,
              decoration: const InputDecoration(labelText: 'Email'),
            ),
            TextField(
              controller: passwordController,
              obscureText: true,
              decoration: const InputDecoration(labelText: 'Password'),
            ),
            const SizedBox(height: 20),
            ElevatedButton(
              onPressed: () async {
                try {
                  if (isRegistering) {
                    await authService.register(
                      emailController.text.trim(),
                      passwordController.text.trim(),
                    );
                  } else {
                    await authService.login(
                      emailController.text.trim(),
                      passwordController.text.trim(),
                    );
                  }
                } catch (e) {
                  ScaffoldMessenger.of(
                    context,
                  ).showSnackBar(SnackBar(content: Text('Error: $e')));
                }
              },
              child: Text(isRegistering ? 'Register' : 'Login'),
            ),
            TextButton(
              onPressed: () {
                setState(() {
                  isRegistering = !isRegistering;
                });
              },
              child: Text(
                isRegistering
                    ? 'Already have an account? Login'
                    : 'Don’t have an account? Register',
              ),
            ),
          ],
        ),
      ),
    );
  }
}

class DashboardScreen extends StatelessWidget {
  const DashboardScreen({super.key});

  @override
  Widget build(BuildContext context) {
    final authService = Provider.of<AuthService>(context);

    return Scaffold(
      appBar: AppBar(
        title: const Text('Dashboard'),
        actions: [
          IconButton(
            icon: const Icon(Icons.logout),
            tooltip: "Logout",
            onPressed: () async {
              await authService.logout();
            },
          ),
        ],
      ),
      body: Center(
        child: Text(
          'Welcome, ${authService.currentUser?.email ?? "User"}!',
          style: const TextStyle(fontSize: 20),
        ),
      ),
    );
  }
}
The updated code snippet gives a full detail of what the lib/main.dart file should look like. There is an AuthGate class that uses the state of the authService.currentUser to display either the login screen or dashboard.
Testing Firebase Dart SDK in Flutter Web App
After following through each of the previous sections to create a Flutter application with the Firebase Dart Admin Auth SDK authentication implementation, it’s time to test everything we have done.
Run the Flutter web app from the root directory of your project using the command below:
flutter run -d chrome
Your terminal should look something like this:

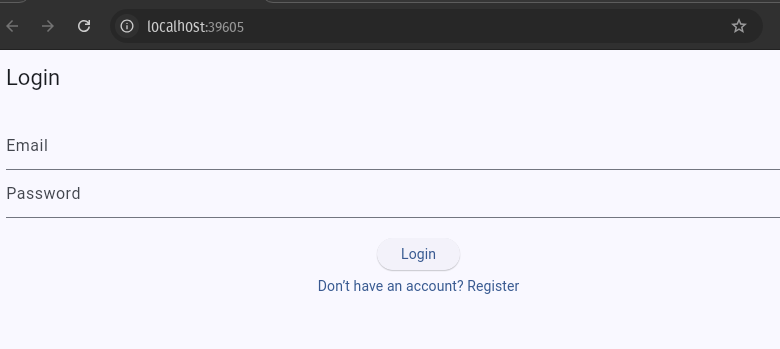
The Flutter web app should launch in debug mode. This should show you the login screen as shown in the screenshot below:
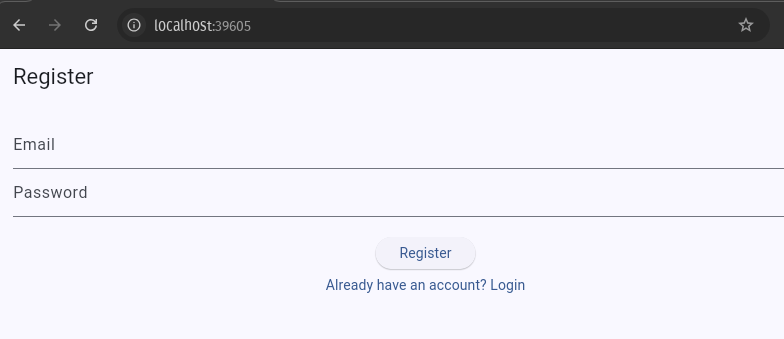
Proceed to register by clicking on the register link and you’ll be redirected to the registration screen. See screenshot below:
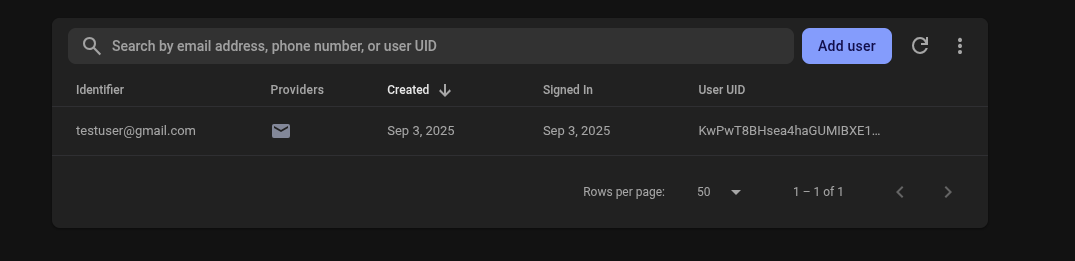
Following a successful registration, the user is redirected to the dashboard as shown below:
You can click the logout button to log out of the application. However, in the Firebase console a new user has been created and added to the database. You should find this information in the Users tab of the Firebase authentication dashboard.

Conclusion
Authentication is a vital part of software development as a means to verify that a certain user is who they say they are before granting them access to an application. It is also a way to limit the access of certain unregistered or anonymous users from using specific features of a software.
Building your own authentication logic can be hectic and more so vulnerable to cyber attacks. Hence, it is important to use reliable authentication services such as that provided by Firebase with straightforward implementation.
Firebase provides auth SDK across multiple languages for developers to make use of. There is also the Firebase Dart Admin Auth SDK for Dart Developers. Dart and Flutter developers can use this Firebase Dart authentication SDK for implementing auth in their various projects.
